How to Record a Zoom Meeting: Step by Step Guide [2025]


![How to Record a Zoom Meeting: Step by Step Guide [2025]](https://cdn.prod.website-files.com/66bf05dee8c5f0991d608526/67c200b616b6f64a7988e8c3_how%20to%20record%20a%20zoom%20meeting.png)

In this post, I am going to explain how to record a Zoom meeting. And I am going to explain two ways to record your Zoom meeting:
- Recording locally and,
- Recording online (Zoom uses cloud recording).
On all devices: Windows, Mac, iOS, and Android devices.
I am going to explain everything you need to know before you hit the record button. I know it can get complex but I am going to simplify it by breaking it down into simple steps that anyone can follow. I’ll explain the requirements, settings, and limitations for each method, and how to access, share, and manage the recordings after your meeting.
.png)
Overview of The Steps Covered in This Guide
- Step 1: Check What You Need to Record A Zoom Meeting
- We will be covering the essentials of how to record a Zoom call effectively.
- Step 2: Set Up Recording On Your Computer And On The Cloud
- Step 3: Start Recording
- Method 1: Record on your computer (Windows/Mac).
- Method 2: Record online on your computer (Windows/Mac).
- Method 3: Record on your phone or tablet.
- Step 4: Find and Manage Your Recordings
- Method 1: Find and use recordings saved on your computer.
- Method 2: Find, share, and manage recordings saved online.
- Step 5: Use Jamie for Transcription and Real Time AI Assistance
- We will show you how to use Jamie to transcribe meetings, and get high quality meeting summaries along with real-time AI assistance.
How to Record a Zoom Meeting?
Step 1: Check Account Requirements and Permissions
Your Account Type
- If you have a free account: You can only save recordings to your computer
- If you have a paid account (Pro, Business or Enterprise): You can save both to your computer and online
Device
- If you are using a computer (Windows or Mac): You can save recordings directly to it
- If you are using a phone or tablet: You can only save recordings online/cloud, and you'll need a paid account for this
Host Permission
- If you are the host: You can start recording immediately
- If you are not the host: You will need permission first I always recommend checking this before your meeting starts to avoid any last minute problems.
Zoom Version
I've learned that if you have an old version of Zoom, you will not be able to record. Here's how to do it:
- Make sure Zoom is up to date
- Update Zoom before your meeting
- This is applicable whether you are using the computer or phone app
Step 2: Enable Recording in Settings (Local or Cloud)
Before your meeting begins, double-check that recording is enabled in your Zoom settings:
#1 Sign In To Zoom

Sign in to the Zoom web portal at zoom.us in a web browser (this is where global recording settings reside). Navigate to Settings, then click the Recording tab.
#2. Enable Local Recording

Find the option “Record to computer” (sometimes labelled Local Recording or Record to local files) and make sure it’s toggled ON.
This allows you (as host) and people you permit to record meetings on their computer. If this setting is locked by an admin (in organizational accounts), you may need to contact your Zoom administrator to enable it.
#3. Enable Cloud Recording (If You Have a Paid Account)

Ensure the “Record to the cloud” option is ON. For most paid users, cloud recording is on by default, but it’s good to confirm.
While in these settings, you can also click Cloud recording settings to choose what gets recorded (for example, you can check options to record the active speaker, gallery view, shared screen, audio transcript, etc., as needed).
#4. Participant Recording (Optional)

If you want to allow participants to record without making them co-hosts, navigate to the option "Who can request host permission to record?"
In this setting you will find three options;

- Internal meeting participants: Only internal participants can request permission to record.
- External meeting participants: Only external participants can request permission to record.
- Meeting participants with specified domains: Participants with specified domains.
#5. Choose Storage Location (Optional)
In the Zoom Desktop App (Windows/Mac), you can specify where local recordings will be saved.
- Open the app’s Settings,

- Go to Recording,

- Check the path for the local recording directory.

You can change it if desired (on Windows) or confirm it on Mac. You can also enable the option “Choose a location to save the recording after the meeting” if you want Zoom to ask you where to save each recording when a meeting ends.
Step 3: Start Recording
Method 01: Start a Local Recording on Windows/Mac (Record to Computer)
Once your meeting is running and you have the proper permissions, you can begin a local recording. Local recordings save the video and audio file onto your computer. I will show you how to save it to your computer, and I will walk you through step by step to make it even easier for you.
#1 Start or join the Zoom meeting as the host.

You need to start or join the meeting as the host. I know this is important because even if you are a regular participant, you won't be able to record without the host's permission.
Well, if you have created the meeting, then you are automatically the host, so that's okay. However, if you are starting an instant meeting, then you are also already the host by default.
#2 Click the “Record” button

Look at the bottom of your Zoom window. I want you to find the "More" button in the toolbar. Click on it, and you will see several options appear. Click on the "Record" option.
#3 Select “Record on this Computer.”
Now this is where you actually do the recording. If you have a paid Zoom account, you will see two options. Let me make it simple for you, just click "Record on this Computer". This is called a local recording. If you have the free version of Zoom, you will not see the other option at all. It will just start recording because this is the only option you have.
But, if you do have a paid account, Zoom will prompt you to choose between “Record on this Computer” (local) or “Record to the Cloud.”
#4 Confirm and begin recording
You'll see a quick notification as it begins. I always tell my clients to look for two things: first, everyone in the meeting will see a notification that the recording has started, and second, you will see a small "Recording" label with a red dot in the top-left/right corner. This is how you'll know it's working properly.
#5 Pause or stop as needed

You are always in the control centre of your recording. Where the Record button used to be, there are now two new buttons:
- Pause button (looks like two vertical lines)
- Stop button (looks like a square)
These buttons work like this:
- If you need to take a quick break, simply click Pause. Once you are ready, click Resume Recording to continue your recording.
- If you pause the recording, it will be kept as one file which is really convenient!
- If you start a new recording of the same meeting, it will create a new file. And this is actually quite useful when you want to cut a long meeting into smaller ones.
#6 End or save the recording
When you end recording, Zoom will need to convert the recording into something you can play (MP4 for video, and M4A for audio).
You will see a progress bar – this is important: DO NOT shut down your computer at this time. I have seen people loose their entire recording because they do not wait for this to be completed.
Once the conversion is done, Zoom will show you where it saved your file. That's it!
Note: The recording will show what view you are using during the call. Meaning if you are using Speaker view, that will be what gets recorded. If you are in Gallery view showing everyone, that is what will be recorded.
Also, it will record any shared screens and all the audio from the meeting. Just remember, chat messages won't show up in the video, but they will be saved separately if you choose to save them.
Method 02: Start a Cloud Recording on Windows/Mac (Record to Cloud)
If you have a Licensed (Pro or higher) account, you can record Zoom meetings to the cloud. Cloud recordings are stored on Zoom’s servers, allowing you to access them online and share via a link:
#1 Start the Zoom meeting as host on your computer.
(Cloud recording, like local, can only be initiated by the host or a co-host – if you’re not the host, you won’t see the option to record to the cloud.)
#2 Click the “Record” button in the meeting controls.
Click the “Record” button, you will see this button in the meeting controls.
#3 Select “Record to the Cloud.”
If prompted to choose a recording mode, click Record to the Cloud.
A small cloud icon may appear on the top-left of the meeting window along with the recording indicator, to confirm you are recording to Zoom’s cloud. All participants will usually see a notification that the meeting is being recorded.
#4 Manage the recording (pause/stop)
You can pause or stop the cloud recording just like a local recording, using the Pause/Stop buttons in the toolbar. Pausing will temporarily halt the cloud recording (and it will resume in the same file when you continue), while stopping will end that recording session (and Zoom will save what’s been recorded up to that point to a file, then start a new file if you resume).
#5 End the recording
When you stop the recording or end the meeting, the recorded data is sent to Zoom’s cloud for processing. You don’t get the file immediately at meeting end; instead, Zoom will process the recording online. Cloud recordings take some time to be prepared on Zoom’s servers. Typically, the processing time is about double the length of the recording (for example, a 30 minute recording might take roughly 30–60 minutes to finalize) but it can be longer if Zoom’s traffic is high.
#6 Confirmation email
After the meeting, you can leave Zoom to process the file in the cloud. You’ll receive an email notification from Zoom when the cloud recording is ready. The email will contain two links: one link for you (the host) to manage the recording, and another shareable link you can give to others to view the recording. You do not need to keep the Zoom app open for the upload or processing – it happens on Zoom’s side even if you close your laptop after the meeting ends. Just ensure your internet connection was stable during the meeting so the recording data reaches Zoom’s servers.
Note: Cloud recordings will capture all content based on your cloud recording settings. This can include speaker view, gallery view, and shared screen (Zoom can even save multiple versions if enabled, e.g., one file of active speaker, one of gallery). However, some things like nonverbal reactions (e.g. “thumbs up” icons) are not recorded in cloud videos. Cloud recordings also save the chat transcript and audio transcript if you enabled those features in settings.
Method 03: Record a Zoom Meeting on Mobile (iOS/Android App)
Recording on a mobile device uses cloud recording – mobile apps do not support local device recording. This means you must have a Zoom paid account (and be the meeting host or co-host) to record from your iPhone, iPad, or Android. Here’s how to do it:
#1 Open the Zoom app
Open the Zoom app on your iOS or Android device. Sign in with your paid account.
#2 Start or host a meeting using the app.
You can schedule a meeting and start it, or start an instant meeting. If you need to record, make sure you are the host. If you join someone else’s meeting, you won’t be able to start a recording unless they made you a co-host, or give you permission to.
#3 Find the Record option in the meeting controls.
On your mobile device, the controls might be hidden until you tap the screen. Tap the screen and look for the toolbar. Usually, on phones, you need to tap “More” (⋯) and then you’ll see a “Record” button in the menu that pops up. On some tablets or larger screens, the Record button might appear directly on the toolbar without needing the More menu.
Tap “Record to the Cloud.”
As noted, mobile Zoom will only give the option to record to cloud. Tap the Record icon and then confirm if it asks to start cloud recording. The app will then begin recording – you’ll see a “Recording…” indicator (on Zoom iOS, a red bar at the top of your screen or a small recording indicator icon). Participants will be notified that the session is being recorded.
Pause or stop recording
To pause or stop on mobile, tap More (⋯) again (or the Recording button) and choose Pause Recording or Stop Recording. On Zoom’s mobile interface, once you tap Stop, it will ask you to confirm to stop the recording. Pausing will simply toggle the recording to pause/resume similar to desktop.
Finish the meeting
When you end the meeting (or stop the recording), the recording is saved to Zoom’s cloud. You won’t have a file on your phone; instead, the recording is uploaded to Zoom’s servers. After the meeting, go to Zoom’s web portal to find the recording.
Just like with desktop cloud recordings, Zoom will process the mobile recording in the cloud. Once processing is complete, the recording will appear in your account’s cloud recordings list online. You’ll also receive the email notification with the links when ready (just as described in Step 4).
Important limitations on mobile: If you are a free user on mobile, you will not see any record option in the app – the Zoom mobile app does not allow recording for free accounts. The only way for a free user to record on mobile is to have the meeting host record (or use a workaround outside Zoom, like using your device’s built-in screen recorder – but doing so may not capture audio and may violate Zoom’s terms or privacy if done without consent). Always inform participants if you plan to use a third-party screen recorder for recording. Officially, Zoom requires a paid account for mobile recording to the cloud, so consider upgrading or recording from a computer if recording is needed.
Step 4: Access and Manage Recording Files
Method 01: Access and Manage Local Recording Files (Windows/Mac)
After a meeting recorded locally (to your computer) has ended and Zoom has finished converting the files, Zoom will typically open the folder on your computer where the recording was saved. If it doesn’t open automatically, here’s how you can access your local recording files:
#1 Default Save Location
By default, Zoom saves local recordings to a Zoom folder on your computer. The typical path is in your Documents folder:
- Windows: C:\Users\[Your Username]\Documents\Zoom
- Mac: /Users/[Your Username]/Documents/Zoom
Inside the “Zoom” folder, recordings are organized by meeting name and date/time (Zoom creates a new subfolder for each recorded meeting). For example, a folder might be named “2023-11-01 14.00 Meeting Title”. Open that folder to find your files.
#2 Recording Files
In the meeting’s folder, you’ll find the recorded files. The main video file is an MP4 file (usually named Zoom_0.mp4 by default) which contains the audio and video of the meeting. If you recorded audio-only or if Zoom saved an audio-only version, you’ll see an M4A audio file (often named audio_only.m4a). You might also see a chat text file (meeting_saved_chat.txt) if you saved the chat, and a transcript file if you enabled live transcription.
#3 Using the Zoom Client to Find Recordings
You can also locate local recordings through the Zoom desktop application. Open the Zoom app and click on Meetings (or Recorded in newer versions). Navigate to the Recorded tab to see a list of meetings you have recorded on that computer. Select the meeting you want, and then click “Open” (or “Open file location”) – this will open the folder containing the recording files on your computer. This is a convenient way if you don’t remember the file path.
#4 Changing the Save Location (Optional)
If you want to save future recordings elsewhere (say, a different drive), you can change the default location in the Zoom app settings (as mentioned in Step 2). On Windows, Zoom allows choosing a new folder for recordings. On Mac, you might be prompted each time after a meeting to choose the save location if that option is enabled (since Zoom on Mac doesn’t allow setting a fixed alternate path via the app UI).
#5 Sharing and Managing Local Recordings
A local recording stays on your computer, so it’s not instantly shareable via Zoom. You’ll need to manually share the file:
To share the recording with others
To share the recording with others, you can send them the MP4 file or upload it to a cloud service or video platform. For example, you might upload the video to Dropbox, Google Drive, OneDrive, YouTube, or Vimeo, and then share the link. (Zoom does not provide a way to upload a local recording back to Zoom’s cloud – that’s not possible.) Make sure to give the file a unique name when you save or upload it (avoid generic names like “Zoom Meeting” to prevent confusion).
If the file is too large to send via email,
If the file is too large to send via email, uploading to a cloud storage (Google Drive, Dropbox, etc.) and sharing the link is a good approach. Ensure the privacy settings of that link are appropriate (e.g., public vs. restricted).
You can also trim or edit the MP4
You can also trim or edit the MP4 using any video editing software before sharing, if you only need to share a portion of the meeting. The M4A audio file can be shared if someone only needs the audio.
To manage or archive recordings,
To manage or archive recordings, you might move the files from the Zoom folder to a different folder on your computer for long-term storage or backup them to an external drive. It’s wise to regularly clean up your Zoom recordings folder if you record many meetings, to free up disk space.
Method 02: Access, Share, and Manage Cloud Recordings (Zoom Cloud)
If you recorded to the cloud, your files are stored in your Zoom account online. Here’s how to access and share cloud recordings after the meeting:
#1 Accessing Cloud Recordings via Web Portal
Log in to your Zoom account at the Zoom web portal (go to zoom.us and sign in). In the left navigation menu, click on Recordings. Then select the “Cloud Recordings” tab. You will see a list of your recorded meetings that have been processed and saved to the cloud. (If you just ended the meeting, you might need to wait until processing is complete for it to appear here – refresh the page after some time if needed.) Click on the meeting name or the recording to view details.
#2 Viewing or Downloading
In the recording details page, you can typically play the video right in your browser, or click a Download button to save a copy of the recording to your computer. There may be multiple files (for example, one for the active speaker view, one for gallery view, an audio file, a chat file, etc., depending on what Zoom captured). You can download any of these.
#3 Sharing a Cloud Recording
Zoom makes it easy to share cloud recordings with others via a link. In the Zoom web portal under your recording’s details, click the Share button for that recording. A dialog will appear with sharing options.
- You can copy the shareable link and send it to others: By default, Zoom cloud recordings are protected by a random access code (password). When you copy the shareable link in Zoom, it usually includes the passcode in the URL for convenience. You can alternatively copy the link and the passcode separately.
- You can adjust the share settings as needed: you can set whether viewers need to enter a passcode (or turn that off to simplify access), and whether only authenticated users (signed-in users) can view, or anyone with the link can view
- You can also decide if viewers can download the recording or only stream it: These options are usually available in the sharing settings dialog – for example, you might check/uncheck “Viewers can download” or “Require passcode” according to your preference. Changes are saved automatically.
Once you’ve adjusted settings, click Copy Link to get the final shareable link, and then send that link via email, chat, or any messaging service to your intended audience. Anyone with the link (and passcode, if enabled) will be able to watch the recording in their browser or download it as allowed.
Alternate Sharing via Download
If you prefer not to use Zoom’s share link, you can download the cloud recording file to your computer and then share it just like a local recording (for instance, send it via a large-file send service or upload to YouTube, etc.). This might be useful if you want to edit the sound or video before sharing or if you plan to host it on a different platform.
Managing Cloud Recordings
Over time, you may accumulate many cloud recordings. To manage your storage, you can delete recordings you no longer need. In the Zoom web portal (Recordings > Cloud Recordings), find the recording and click Delete (or More > Delete). Be aware that if you delete a cloud recording, it may go into a trash for a limited time (usually 30 days) where you can recover it if needed, after which it’s permanently removed. Some accounts have auto-delete schedules (e.g., auto-delete after 30 or 60 days), so check your Zoom recording settings or with your admin if applicable. If you need to keep recordings long-term, download them before they auto-delete.
Security
If your recording contains sensitive information, use Zoom’s account settings again to add a passcode or restrict access. You can also disable the option for viewers to download the file, so they can only stream it (though determined individuals might still find ways to save it). For highly confidential meetings, consider downloading and sharing via a more secure method instead of leaving it on Zoom’s cloud indefinitely.
Finally, always remember to inform participants that the meeting is being recorded. Zoom will display a notification to participants when recording starts (and some regions require consent). It’s good practice to verbally announce it as well. Properly managing your recordings – whether stored locally or in the cloud – ensures you can refer back to important meetings and share them with those who need the information.
What Are the Drawbacks of Recording Meetings in Zoom?
1. Cloud Recording Storage Limit
If you have a paid Zoom account, you will get some cloud storage. But it is not unlimited. Once your cloud storage is full, you will have to either delete old recordings or pay for additional storage. And if recording many meetings, you will find this to be very difficult.
2. No Built-In Editing Features
Zoom saves your video recordings as MP4 files. But you cannot edit these files from within Zoom. When you need to clean up my video meeting recording or cut out a few parts of my recording, you have to use separate video editing software. I know it can be very frustrating when you want to simply edit a few things about your recording.
3. Recording Consent and Privacy Issues
Every time you press the record button, Zoom sends a notification to everyone in the meeting. Although many appreciate this, I have seen that some people tend to get uncomfortable with this feature. And you also have to be aware of the privacy issues, I'm sure you have heard or read about the places where you have to take consent from everyone before you record. I would advise you to go through these privacy issues, because you don't want to get into legal issues later.
Just to be safe, regardless of the notification, please do take the consent of the attendees before recording the zoom meeting.
4. Large File Sizes for Local Recordings
If you are saving the recordings to your local computer, they can be quite large. One-hour meeting can take up several gigabytes of storage. I myself have had the issue of running out of local storage space on my laptop, and I don't want you to go through the same thing. You will need to plan out your storage accordingly.
5. No Automatic Transcription on Free Accounts
If you are using a free Zoom account, there will be no automatic transcription. You will either have to do the transcription yourself or pay to have it done for you. I know how time-consuming that can be when you are trying to review the meeting notes.
6. Cloud Recordings May Take Some Time To Process
When you record to the cloud, the recording may take some time to process. I have waited for some critical meetings to be processed for a few hours. This is something that you have to keep in mind, especially if you want to share this recording with your team members very quickly.
Get Perfect Meeting Summaries With Jamie
Jamie is an AI Meeting assistant tool that helps you capture highly detailed transcription and AI meeting summary. Jamie do not send out annoying bots to your calls that would cause awkward interruptions.
Jamie records everything in the background and captures all the important things for you. And when I mean everything, I mean literally everything – all the key points that you can normally miss out on when you're typing away furiously, as well as all of the action items and decisions.
Here’s a quick comparison between Zoom AI companion and Jamie, just to show you how we can provide you a better, non intrusive meeting experience with amazing AI assistant features.
Quick Glance at Zoom AI Companion Vs Jamie

Follow these simple steps to start using Jamie with Zoom and get perfect meeting notes every time.
Step 1: Download Jamie
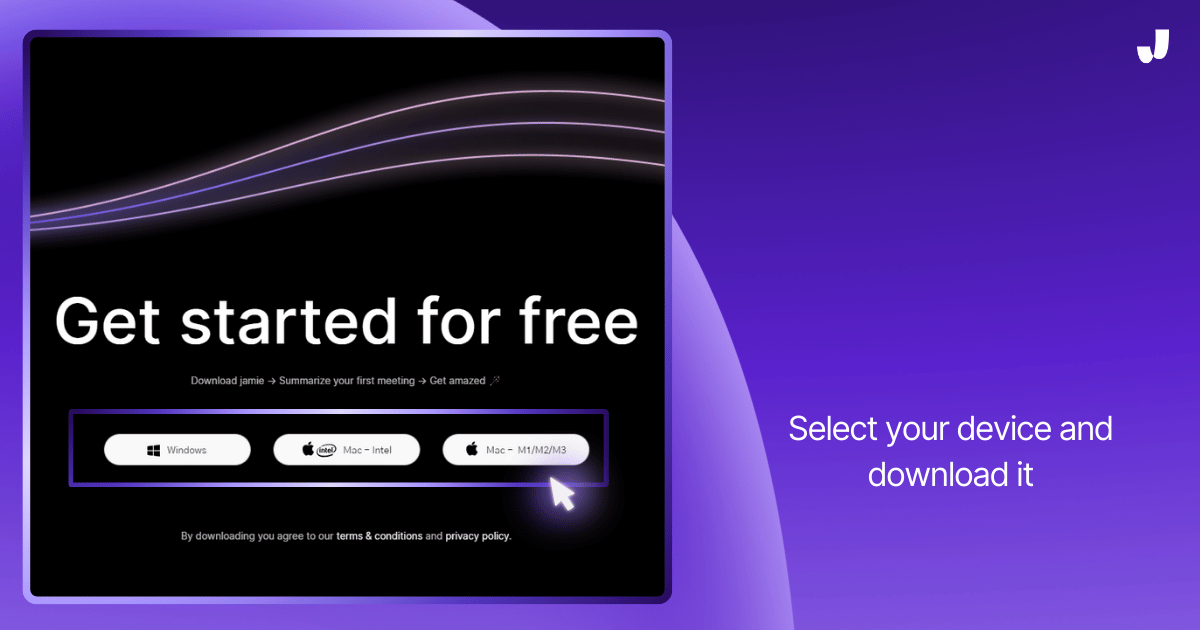
I will show you step by step how to download Jamie. Here's what you need to do:
- First you must go to Jamie's website
- Find the download button, you can download either Windows or Mac
- And then just follow the simple install steps.
💡Please note that Jamie is currently a native application Jamie works wherever you do.
This means;
- Jamie works offline and online
- Jamie works for in-person meetings
- Jamie do not send out bots to your meetings
- Jamie can transcribe any ad hoc meetings
- No you do not need extensions or any other plug-ins for Jamie to work
- Jamie works in any and all video conferencing platform.
- Jamie simply works! Its plug and go!
Step 2: Start or Join Your Zoom Meeting
Now let me show you how to use Jamie with your Zoom meetings. I know you might have concerns about permissions, but here's the good news - you can use Jamie whether you are the host of the meeting or you are a participant in the meeting.
Here is what you have to do:
- If you are the host, you simply start your Zoom call as you normally would
- If you are joining another meeting, you simply join as you normally would
💜 Gentle reminder

Yes, you do not need direct permissions from Zoom hosts within the Zoom meeting interface to start Jamie. But you must adhere to our security and privacy protocol of Jamie to let your attendees or hosts know you are transcribing the meeting.
It is crucial you let them know its only transcription, because Jamie do not record audio or video files. Audio recordings are deleted soon after transcription for added privacy.
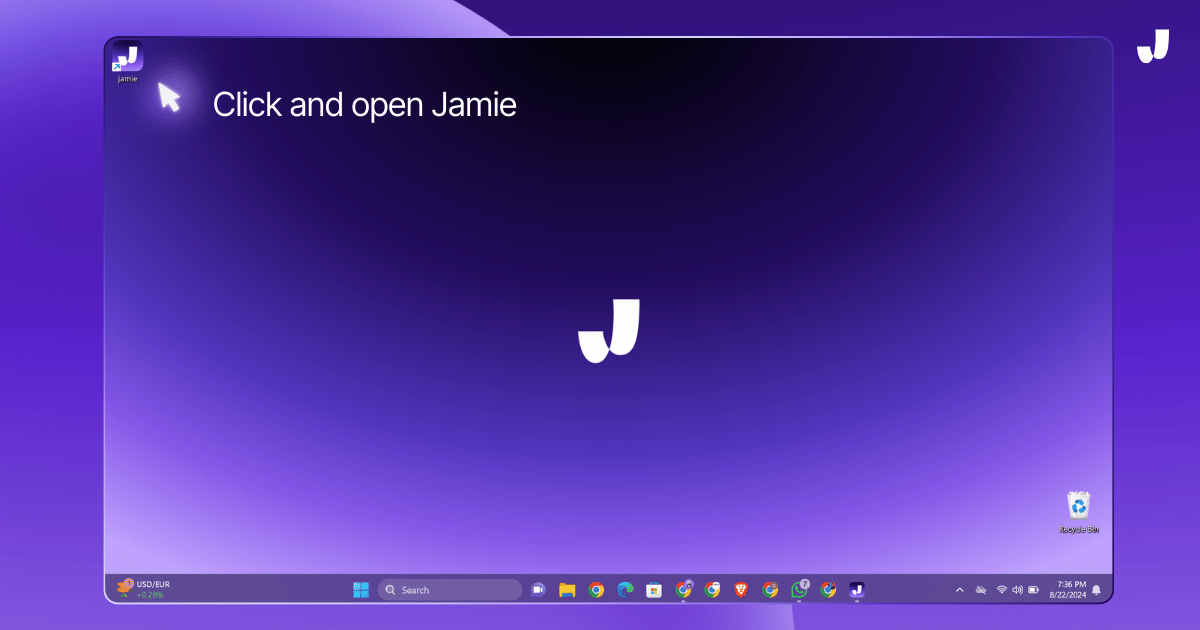
Step 3: Start Recording with Jamie

I will now guide you through how to start the recording - it is very simple:
- Start by running your Zoom meeting
- Open Jamie on your computer
- Click the "Start Meeting" button
Step 4: Stop Jamie Once The Meeting Ends

Once the meeting comes to and end you can go ahead and stop the meeting as shown above. This will them prompt Jamie to analyze the audio and generate your notes for you.
Once the transcription process is over, it will then delete the audio for added privacy.
Step 5: Speaker Identification

Next up is the speaker identification process.
Jamie will identify how many speakers were present during the meeting through its intelligent speaker diarization process. You will then listen to the parts of the clips to identify the speakers' voices and name them.
Jamie then learns the speakers' voice, so that you won't have to manually input their voices each and every time. You might have to input their names maximum of 5 times (or less), for Jamie to properly learn and identify their voices automatically.
Step 6: Get Your Meeting Summary Instantly
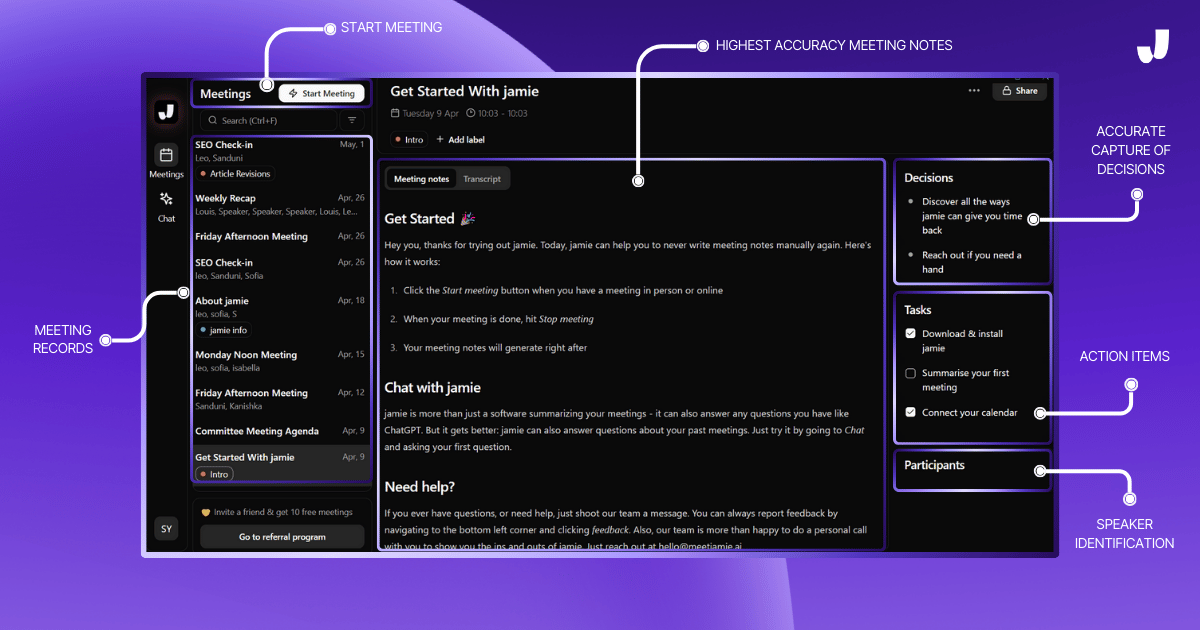
This is literally my favourite part, once the meeting is over, Jamie will give you a perfect summary instantly. No more waiting, transcribing or cursing your own handwriting.
- Just open Jamie and there it is
- All the important information is neatly organized
- You can edit it if you want to (which I never do because Jamie is mostly always spot on!)
- You can share also share it via a link or directly to their email. You also have the option to copy their entire transcript or meeting summary and paste it and share.
Bonus: Use Jamie’s Executive Assistant Sidebar for Instant Help
What Is Jamie's Executive Assistant Sidebar?
Think of it as a chatgpt that you can summon through a simple short CTRL + J. That's exactly what Jamie's Sidebar is.
Jamie's sidebar consists of three LLMs.
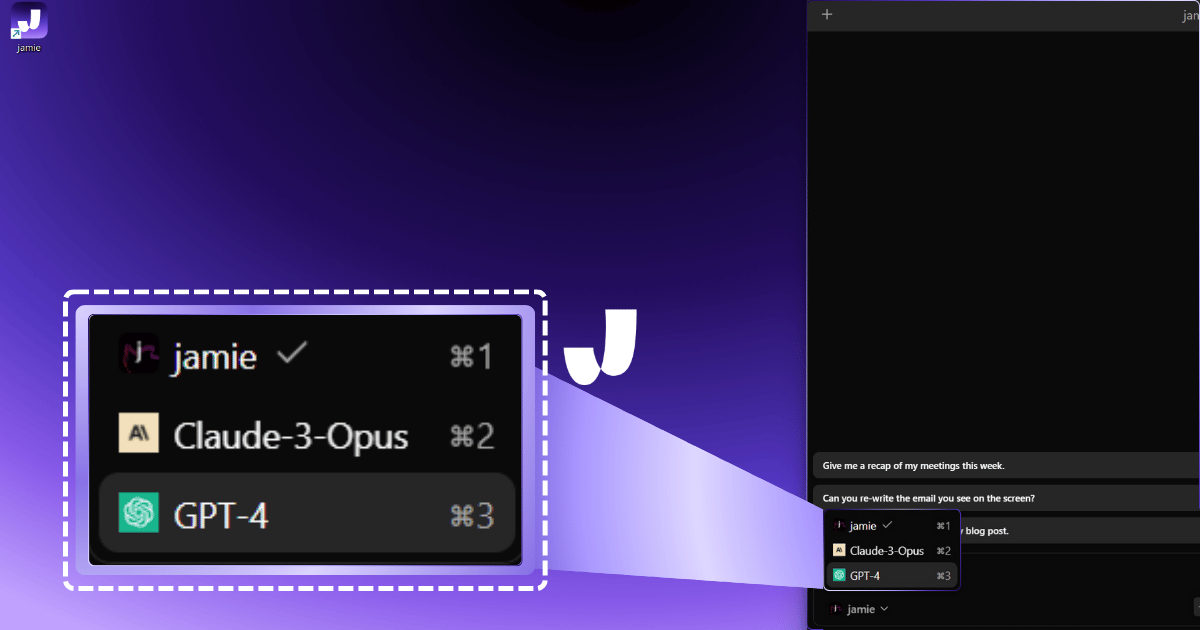
- Jamie's LLM: To search + brainstorm + write emails + coaching tips + seek missed opportunities + seek deal closing points + highest potential clients, literally anything you want via your past meeting archives. You simply have to chat with Jamie! And it will search your past meeting archives to produce the information you need.
- ChatGPT 4 LLM: To search the web for latest information, or for simple brainstorming like how you would use Chatgpt for.
- Claude 3 Opus LLM: For similar Chatgpt like functionalities and use cases.
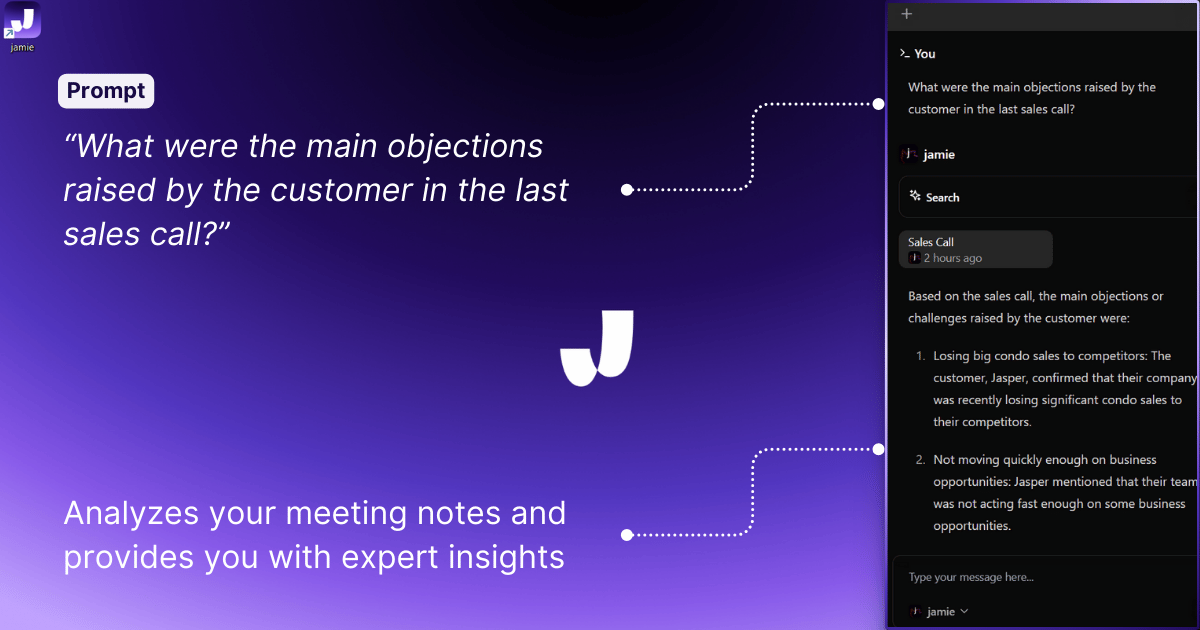
How Jamie's Sidebar Assists You In Real Time?

Suppose you are in a meeting, and your client or a participant brings out a question about a past meeting, or something regarding sales. You do not have to open a new tab, or browser to find the information you need. Simply let Jamie do the work for you.
Open Jamie and type in the question you want Jamie to find or brainstorm. And Jamie will find the answers for you instantly just as shown below and in the above use case scenario.

Quick Recap Of Jamie's Benefits.
- It writes down everything that's said after your meeting ends.
- It does not send out meeting bots to preserve privacy and human connection.
- It knows who's talking and labels each person correctly (after minimum training).
- It picks out all the important tasks and decisions.
- It organizes everything neatly for you through its advance topic detection technology.
- And if you have a bi-lingual meeting, Jamie will accurately identify the languages spoken.
- Jamie's transcription will be in the exact languages as they are spoken
- Jamie's summary will be in the dominant language spoken during the meeting.
- It helps you real-time through its Sidebar feature, so you don't have to open unnecessary tabs or browsers to get the instant help you need.
- It works both offline and online.
- It works with all online video conferencing platform.
💜 Gentle Reminder
All our premium features are available in Jamie's free plan. We are super confident in our tool and the value it brings to our users. Which is why we want you to explore Jamie to its fullest potential. Give Jamie a try for free with all the features included, so you won't miss out on anything!.
FAQs on How to Record a Zoom Meeting
Can I Record a Zoom Meeting Without Host Permission?
Recording a Zoom meeting without host permission is not possible through Zoom's built-in features. Only hosts and participants who have been granted recording permissions can legally record meetings. Attempting unauthorized recording through third-party tools may violate Zoom's terms of service and privacy laws.
Where Are Zoom Recordings Saved on My Computer?
By default, Zoom saves local recordings to a folder on your computer (usually in your Documents directory). On Windows, the recordings are stored under C:\Users\<YourUsername>\Documents\Zoom, and on macOS, they are in /Users/<YourUsername>/Documents/Zoom. You can change this default save location in the Zoom application’s settings under the “Recording” tab.
How Long Do Cloud Recordings Stay Available?
Zoom’s Basic (free) plan does not include cloud recording, so cloud recordings aren’t available for free users. For paid accounts, cloud recordings remain on Zoom’s servers until deleted or as limited by your plan’s retention policy. Many Zoom accounts have an auto-deletion setting that removes cloud recordings after 30 days by default, but this can be adjusted. Higher-tier plans or custom settings may allow recordings to be stored longer (even indefinitely) as long as you have an active account and enough cloud storage.
Can I Record a Zoom Meeting on My Phone?
Yes – but only if you have a paid Zoom account with cloud recording enabled. The Zoom mobile app does not support local recording on iOS or Android devices. This means free users cannot record on their phones, since mobile recording requires using Zoom’s cloud recording feature (available to Pro, Business, or higher accounts). In short, a licensed (paid) host can start a cloud recording from the Zoom app on a phone, but Basic/free hosts cannot.
How Much Storage Space Do Zoom Recordings Use?
The file size of a Zoom recording depends on the meeting’s duration and video quality. As a rough estimate, a one-hour Zoom meeting recorded in standard HD (720p) might be on the order of 200–300 MB of disk space. If you want to know how to record zoom meeting in full HD (1080p), the file size will be larger – often around 500 MB (or more) per hour of video. Keep in mind the exact size can vary based on what’s shown in the meeting and Zoom’s compression, but Zoom’s recordings are generally optimized to be relatively small for the quality provided.
What’s the Maximum Recording Time for Free Accounts?
Free Zoom accounts are limited to meetings of 40 minutes for group calls, and this same limit applies to recordings. In other words, if you’re a Basic (free) user hosting a multi-person meeting, the session (and any recording of it) will end automatically after 40 minutes. There is no separate recording time cap beyond the meeting time limit. Paid accounts don’t have the 40-minute restriction – a meeting (and recording) can run up to 30 hours on a licensed plan.
Can Multiple People Record the Same Zoom Meeting?
Yes. Multiple participants can record a Zoom meeting simultaneously, but the host must grant them permission first. By default, only the host is allowed to record, but the host can enable local recording for other participants. If given recording permission, each authorized participant can start a local recording on their own computer during the meeting. On paid plans, a co-host or alternate host can also start a cloud recording, though all cloud recordings for a meeting will still be saved under the host’s Zoom account (even if a co-host starts it). Remember that recording a Zoom meeting without the host’s consent (or without notifying participants) may violate Zoom’s terms of service and privacy laws.
Sources
Growth Content Editor
Sanduni Yureka is a Growth Content Editor at Jamie, known for driving a 10x increase in website traffic for clients across Singapore, the U.S., and Germany. With an LLB Honors degree and a background in law, Sanduni transitioned from aspiring lawyer to digital marketing expert during the 2019 lockdown. She now specializes in crafting high-impact SEO strategies for AI-powered SaaS companies, particularly those using large language models (LLMs). When she’s not binge-watching true crime shows, Sanduni is obsessed with studying everything SEO.
Read more
.png)

3 min to save 1000 hours
Download Jamie now
Start your meeting
Super-charge your workday
.-p-500.png)


