How to Do Breakout Rooms in Zoom: Step-by-Step Guide [2025]


![How to Do Breakout Rooms in Zoom: Step-by-Step Guide [2025]](https://cdn.prod.website-files.com/66bf05dee8c5f0991d608526/67fce28edc401c7737d3f112_How%20to%20do%20breakout%20rooms%20in%20zoom.png)

Zoom breakout rooms are useful for workshops, team meetings, and virtual events—anytime you need smaller groups or separate sessions to chat, brainstorm, or collaborate. But to get the most out of them, you need to know how to set them up the right way.
In this guide, I’ll show you how to do breakout rooms in Zoom. As a bonus, I’ll also introduce an AI note-taker for Zoom, so you can be fully present in your meetings without worrying about taking notes. Let’s begin!
What Are Zoom Breakout Rooms and Why Should You Use Them?
Zoom breakout rooms let you split a large meeting into smaller, focused discussions. It’s difficult to keep track of conversations when everyone starts talking over each other in a crowded meeting. Breakout rooms create space for deeper engagement and more productive conversations.
From online classes, corporate webinars, to workshops, you can use Zoom breakout rooms for different types of virtual meetings.
The Impact of Breakout Rooms
Ever been in a big virtual meeting where only a handful of people actually talk while everyone else stays on mute? Yeah, we’ve all been there.
That’s where breakout rooms come in—they shake things up and make meetings way more productive and memorable. Here’s how breakout rooms make meetings better:
1. More engagement
It's easy to zone out in a big meeting. But when you’re in a smaller group, there’s nowhere to hide (in a good way!). Breakout rooms encourage participation because everyone has a chance to speak. Instead of just listening, you’re actively contributing, which keeps the meeting interesting and interactive.
2. You actually remember stuff
Breakout rooms create a space for genuine discussions and problem-solving, which makes information stick. When you talk things through instead of just hearing them, your brain holds onto it better.
.png)
3. Faster, more focused collaboration
With fewer people in the conversation, you can stay on topic, exchange ideas faster, and make decisions without unnecessary delays.
Limitations of Zoom Breakout Rooms
- If you join a Zoom meeting from the mobile app or SIP/H.323 devices, you can participate in breakout rooms but cannot manage them
- Cloud recording captures only the main room's meeting, not breakout rooms. To record a breakout room, you must use local recording and have host permission Each recording captures only the room the participant is in
- You can create up to 100 breakout rooms, with up to 1,000 participants pre-assigned (the exact number depends on which plan you’re on)
When Should You Use Breakout Rooms?
✅ Best for: Small group discussions, brainstorming, workshops, role-playing exercises
❌ Not ideal for: Large-scale presentations, Q&A-heavy sessions, meetings where everyone needs to hear the same information
Now, let’s get to the step-by-step process of setting up a Zoom breakout room.
Also Read: Zoom Review: Is It Worth It in 2025?
How to Enable Breakout Rooms in Zoom Before Your Meeting?
Breakout rooms allow you to divide your Zoom meeting into as many as 100 smaller sessions.
The meeting host has the flexibility to assign participants to specific breakout rooms automatically or manually, or they can enable participants to choose and join rooms on their own. As the host, you can also move between sessions as needed.
Here’s how you can enable breakout rooms at the user level, account level, and group level.
User Level
Follow these steps to turn on breakout rooms in your own Zoom account:
1. Sign in to the Zoom web portal.
2. In the navigation menu, go to Settings.
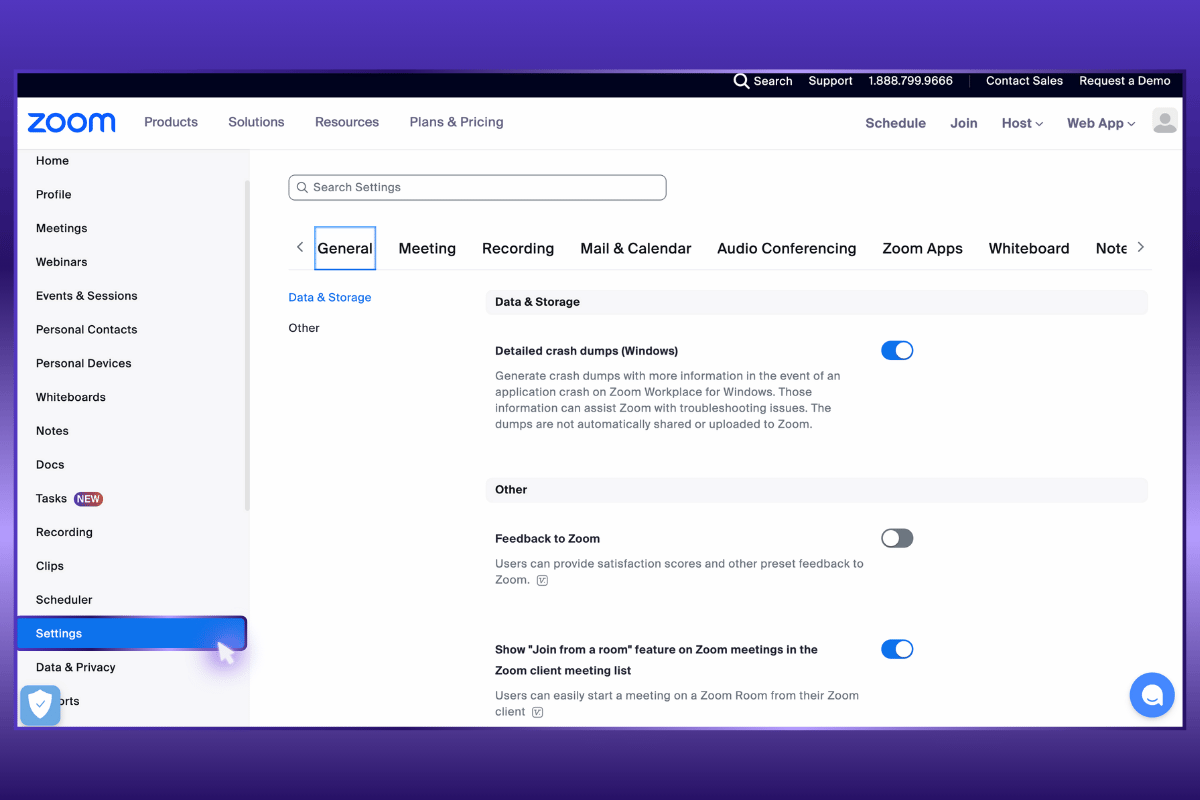
3. Click the Meeting tab.
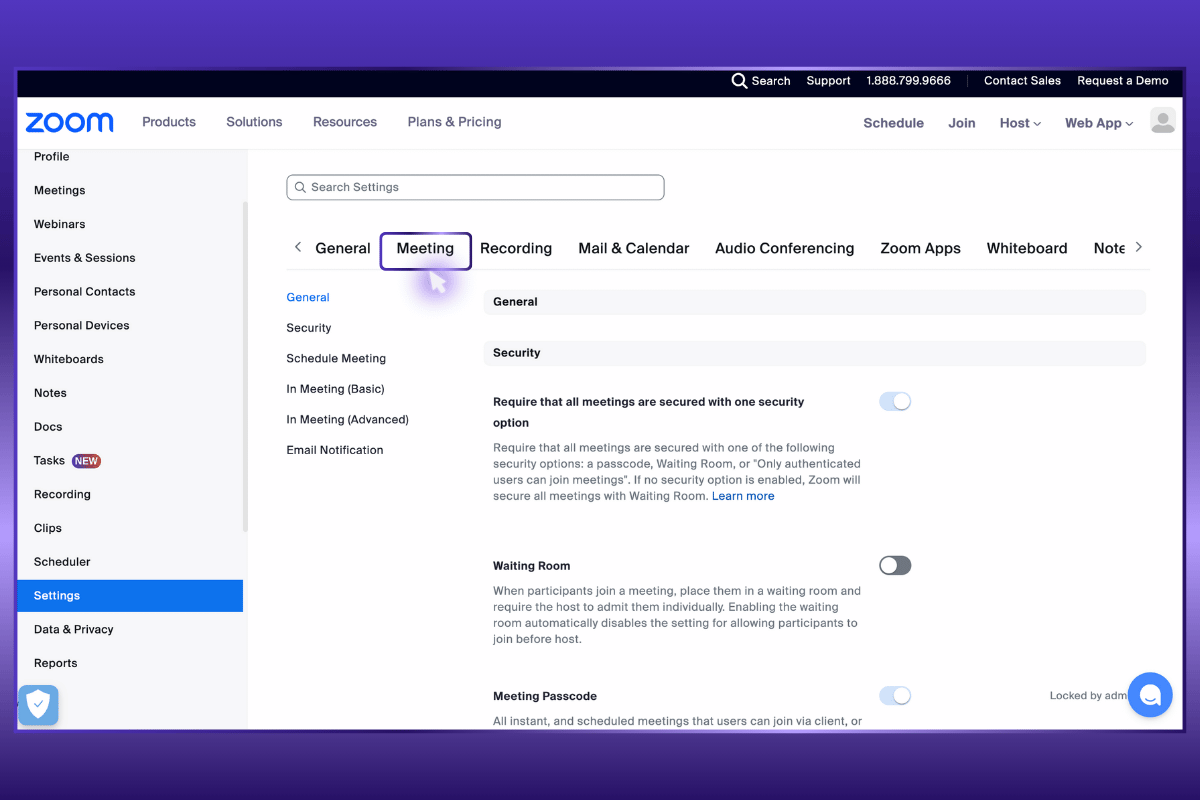
4. Under In Meeting (Advanced), toggle Breakout Room – Meetings to enable it.

5. If prompted, click Enable to confirm.
If this option is grayed out, it has been locked at the group or account level. Contact your Zoom admin for assistance.
Optional Breakout Room Settings
You can customize breakout rooms by selecting any of the following options and clicking Save:
- Pre-assign participants when scheduling a meeting
- Broadcast messages to all breakout rooms via text
- Broadcast voice to breakout rooms (requires Zoom version 5.12.0 or higher)
- Monitor participant activity, such as screen sharing or raised hands (requires version 5.10.3 or higher; not available for participants using certain devices like phone, H.323, and SIP)
- Set default breakout room behaviors (available in version 6.0.10 or later)
Account Level
To activate the breakout room feature for all members of your organization, follow these steps:
- Sign in to the Zoom web portal as an administrator with permission to edit account settings.
- In the navigation menu, go to Account Management > Account Settings.
- Click the Meeting tab.
- Under In Meeting (Advanced), toggle Breakout Room – Meetings to enable it.
- If prompted, click Enable to confirm.
Optional Breakout Room Settings
You can customize breakout rooms by selecting any of the following options and clicking Save:
- Pre-assign participants when scheduling a meeting
- Broadcast messages to all breakout rooms via text
- Broadcast voice to breakout rooms (Zoom version 5.12.0 or higher required)
- Manage breakout rooms in real time, including creating, renaming, and deleting rooms while they are open (requires version 5.9.3 or higher)
- Monitor participant activity, such as screen sharing or raised hands (hosts and participants need version 5.10.3 or higher)
- Set default breakout room behaviors (available in version 6.0.10 or later)
To prevent users from changing this setting, click the lock icon, then select Lock to confirm.
Group Level
To activate breakout rooms for all members of a specific group, follow these steps:
- Sign in to the Zoom web portal as an administrator with permission to edit groups.
- In the navigation menu, go to User Management > Groups.
- Select the group name from the list.
- Click the Meeting tab.
- Under In Meeting (Advanced), toggle Breakout Room – Meetings to enable it.
- If prompted, click Enable to confirm.
If this option is grayed out, it has been locked at the account level and must be changed there.
Optional Breakout Room Settings
Customize breakout rooms by selecting any of the following options and clicking Save:
- Pre-assign participants when scheduling a meeting
- Broadcast messages to all breakout rooms via text
- Broadcast voice to breakout rooms (requires Zoom version 5.12.0 or higher)
- Manage breakout rooms in real time, including creating, renaming, and deleting rooms while they are open (requires version 5.9.3 or higher and must be enabled by Zoom)
- Monitor participant activity, such as screen sharing or raised hands (requires version 5.10.3 or higher; not available for participants on certain devices like phone, H.323, and SIP)
- Set default breakout room behaviors (available in version 6.0.10 or later)
To prevent group members from modifying this setting, click the lock icon, then select Lock to confirm.
How to Create Breakout Rooms in Zoom During a Meeting?
For Windows/macOS
1. Start an instant or scheduled meeting.
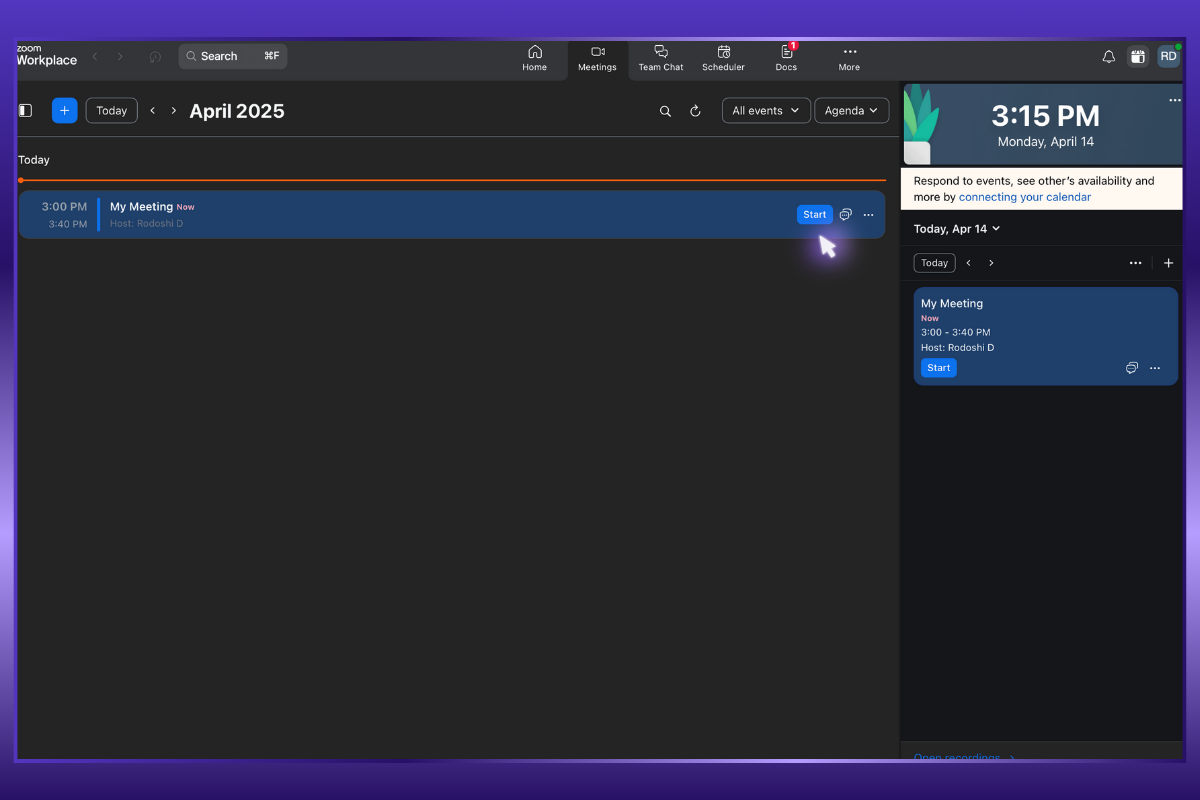
2. Click More > Breakout Rooms.
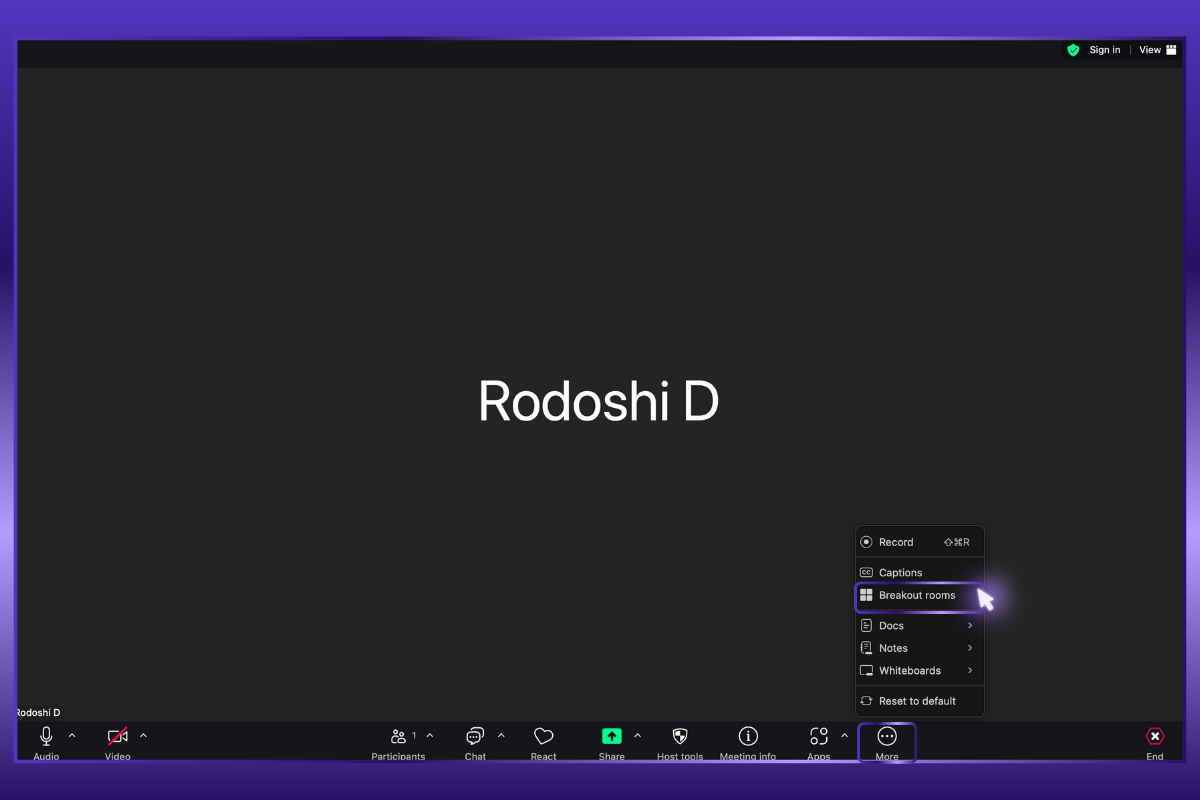
3. Choose the number of rooms and how participants will be assigned to breakout rooms:
- Assign automatically: Zoom evenly distributes participants into rooms
- Assign manually: You select which participants go into each room
- Let participants choose a room: Participants can join any room on their own
- Load pre-assigned rooms: Use pre-assigned breakout rooms or previously saved assignments
- Include co-host(s) in automatic assignment: Disabled by default, but you can include co-hosts in automatic room assignments
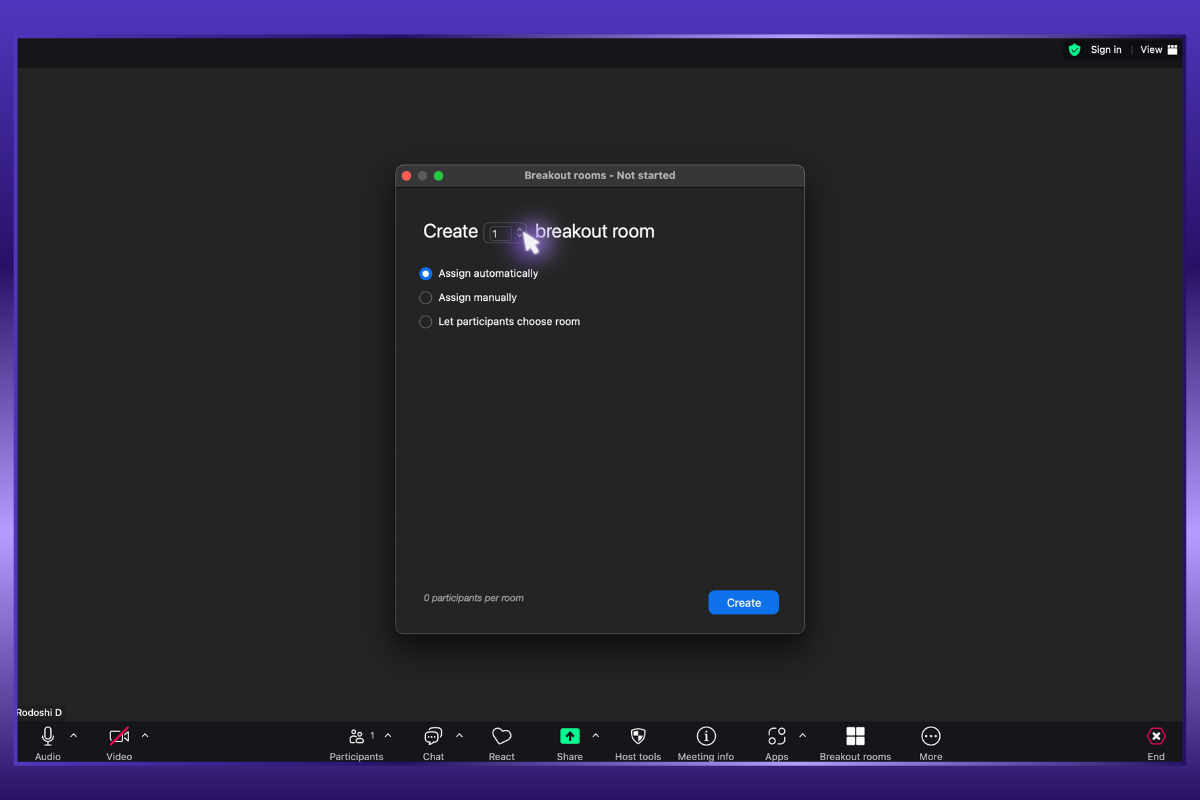
4. Click Create.
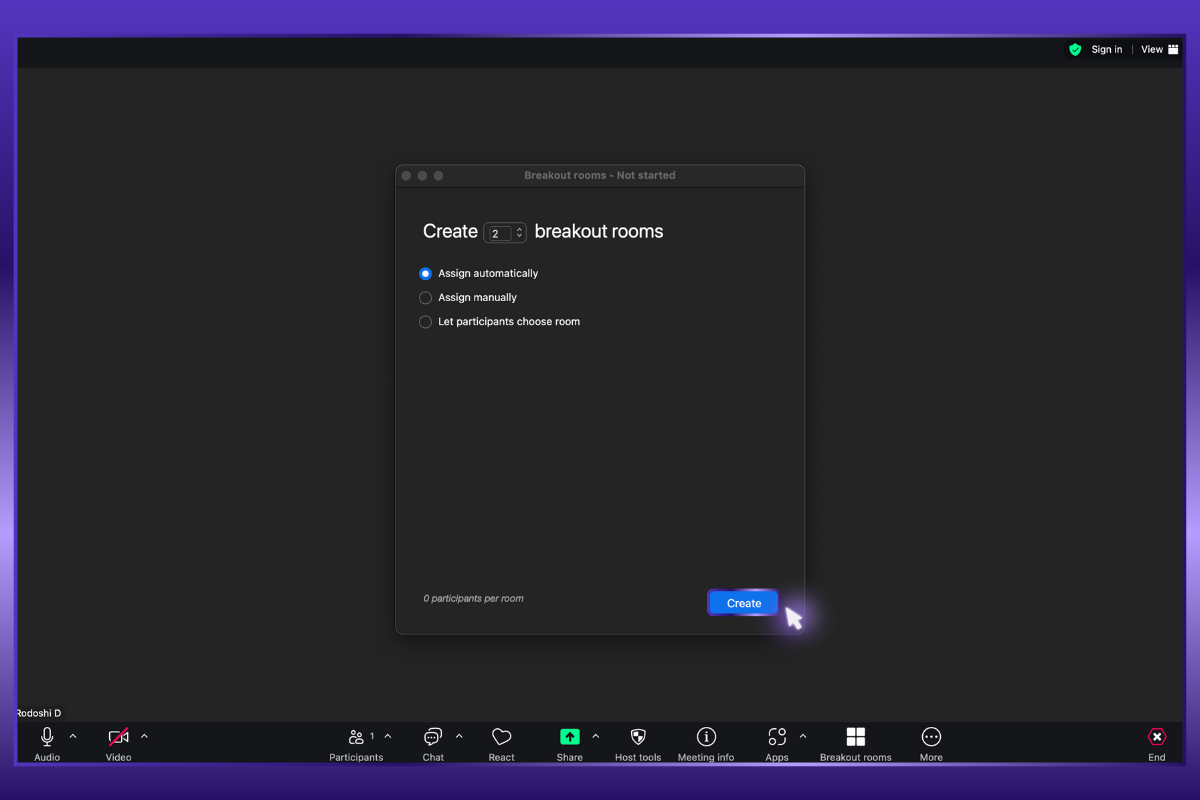
The breakout rooms will be created but will not start automatically. You can manage them before launching.
After creating breakout rooms, click Options (Windows) or the gear icon (macOS) to access additional settings:
- Allow participants to choose a room: Participants can select and enter rooms themselves
- Allow participants to return to the main meeting session at any time: If enabled, participants can rejoin the main session whenever they choose. If disabled, they must wait for the host or co-host to close the rooms
- Automatically move assigned participants into breakout rooms: Moves participants into rooms without requiring them to click Join
- Automatically return selected participants to the main meeting: Moves all participants back to the main session when breakout rooms close, skipping the 60-second wrap-up timer
- Auto-close breakout rooms after (X) minutes: Breakout rooms will close automatically after the specified duration
- Notify host when time limit is over: The host and co-hosts receive a notification when breakout room time ends
- Set countdown timer: Displays a countdown for participants in breakout rooms before returning them to the main session
For Zoom Web Client
- Start an instant or scheduled meeting.
- Click Breakout Rooms.
- Choose the number of rooms and how participants will be assigned:
- Assign automatically: Zoom evenly distributes participants into rooms
- Assign manually: You select which participants go into each room
- Let participants choose a room: Participants can join any room on their own
- Load pre-assigned rooms: Use pre-assigned breakout rooms or previously saved assignments
- Include co-host(s) in automatic assignment: Disabled by default, but you can include co-hosts in automatic room assignments
- Click Create.
The breakout rooms will be created but won’t start automatically. You can manage them before launching.
After creating breakout rooms, click Options to access additional settings. The options are similar to the ones on Windows and macOS.
How to Assign Participants to Breakout Rooms in Zoom?
By default, only the host or co-host can assign participants to breakout rooms. But hosts can enable an option that allows participants to select their own rooms when launching breakout sessions.
Here’s how you can assign participants during a meeting:
- Click Breakout Rooms during the meeting.
- Next to the room you want to assign participants to, click Assign.
- Select the participants you want to add to that room.
- Repeat this process for each breakout room.
Once you assign a participant, the number of participants in that room will be displayed in place of the Assign button.
You can also rearrange participants. Any participants who are not assigned will remain in the main meeting when the rooms start.
Here’s how you can manage participants and rooms:
Hover over a participant or room to access the following options:
- Move to (participant): Move a participant to a different breakout room
- Exchange (participant):Swap a participant with another in a different room
- Delete Room: Remove a breakout room.
Want to recreate and add rooms? Here are your options:
- Recreate all rooms: Deletes all breakout rooms and allows the host/co-host to create new ones
- Recover to pre-assigned rooms: Restores breakout rooms to their original pre-assigned setup (available only if pre-assigned breakout rooms were used)
- Add a room: Creates an additional breakout room
How do you start the breakout rooms?
Click Open All Rooms to launch the breakout sessions. Assigned participants will receive a prompt to join their designated rooms.
- If participants can choose their own rooms, they can open the room list and select one to join
- The host and co-host who launched the breakout rooms will remain in the main meeting until they manually join a breakout room
What are the key breakout room controls?
Hosts and co-hosts can access the following options:
- Rename: Change the breakout room’s name
- Join: Enter a breakout room
- Leave: Exit a breakout room and return to the main meeting (only visible when inside a room)
- Delete Room: Remove an open breakout room (only possible if the room is empty or has not been started)
- Broadcast: Send a text message or broadcast microphone audio to all breakout rooms (must be enabled in Breakout Room settings)
- Add Room: Create an additional breakout room
- Close All Rooms: Ends all breakout sessions with a 60-second countdown, returning participants to the main meeting
How to Record Breakout Rooms in Zoom?
If you’re using cloud recording, only the main meeting will be recorded—breakout rooms won’t be captured, no matter which room you’re in as the host.
To record breakout rooms, you need to use local recording on your computer. As the host, you must give specific participants permission to record. Each recording will only capture the breakout room that the participant is in. You can allow multiple participants to record locally.
What Are Best Practices for Facilitating Effective Breakout Room Discussions?
1. Set clear objectives and instructions
Before assigning participants to breakout rooms, provide clear guidance on the purpose of the discussion. Outline key questions, expected outcomes, and any specific tasks they should complete. This ensures that conversations stay focused and productive.
2. Choose the right group size
The ideal group size depends on the nature of the discussion. In my experience, for brainstorming, 4 to 6 participants allow for diverse perspectives without becoming overwhelming. For deeper discussions or decision-making, 3 to 4 people work well to encourage meaningful contributions from each participant. Larger groups make it harder for everyone to engage.
3. Manage time effectively
Breakout room sessions need structure to stay on track. Provide participants with a suggested time breakdown, such as a few minutes for introductions, the majority of the time for discussion, and the final few minutes for summarizing key discussion points.
4. Capture and share key takeaways
To maximize the impact of breakout room discussions and retain information, use automated meeting notes software that can summarize key discussion points and share those insights with participants after the meeting ends.
Extract Detailed Notes and Insights from Zoom Meetings with Jamie
Breakout rooms encourage focused discussions in Zoom meetings, but keeping track of multiple conversations can be a challenge. That’s when Jamie, your AI-powered meeting assistant, comes to the rescue.
See how Jamie works:
When your meeting splits into breakout rooms, participants can capture their discussions individually, ensuring that no valuable insights, decisions, or action items fall through the cracks.
After the meeting, Jamie processes these recordings and:
✅ Delivers accurate transcripts
✅ Generates high-quality, human-like summaries, and action items from each breakout session
✅ Extracts action items from each breakout session
With Jamie, you can review key takeaways at a glance—no more sorting through messy notes!

Using Jamie’s Executive Assistant Sidebar, powered by advanced AI models like GPT-4, Claude 3.5, and Jamie’s own AI, you can:
✅ Instantly access meeting notes
✅ Glean key insights
✅ Get answers to your questions—right when you need them

Sharing meeting notes is quick and easy. Jamie lets you:
✅ Send notes via email
✅ Copy and paste them
✅ Generate a shareable link

The best part is, Jamie works entirely offline. With this EU-hosted, GDPR-compliant tool, your data stays private and you don’t have to worry about annoying meeting bots eavesdropping on your conversations.
💜 All of Jamie's premium features are available in the free plan. Get started with the free tier and commit to a paid plan only when you absolutely love the tool. (We're confident we'll win you over soon!)
Don’t just take our word for it—hear it from our real-life users:
👉 Sadra Hosseini, CEO of Ryft, saves 8+ hours each week with Jamie
👉 Anna Lösch, a key account manager and event director, cut down meeting follow-up time from 60 to 12 Minutes
👉 Dmitry Andrusenko, an HR and talent development lead, has improved meeting transcription accuracy by 90%
Download Jamie for free today and make every Zoom meeting more productive!
Or if you’d like to see the tool in action before making a move, book a free demo.
Read More
- Zoom Meeting Summary: Summarize your Zoom video calls with Jamie
- Screen Sharing on Zoom: Learn how to share screen on Zoom for different devices
- Zoom Background Blurring: Find out how to quickly blur your Zoom background in a few simple steps
- How to Change Name on Zoom: A step-by-step guide to change your display name on Zoom
- How to Schedule a Zoom Meeting: Know how to schedule Zoom meetings from desktop, mobile, and web
- Zoom Tips & Tricks: Discover ways to make the most of Zoom's features
Growth Content Editor
Rodoshi Das is a Growth Content Editor at Jamie. With a marketer’s mindset and a researcher’s curiosity, she crafts product-led B2B SaaS content that drives results. When she’s not brainstorming strategies, you’ll find her lost in her books, rewatching The Office for the hundredth time, or planning her itinerary for a trip to the mountains.
Read more
%20(4).png)

3 min to save 1000 hours
Download Jamie now
Start your meeting
Super-charge your workday
.-p-500.png)


